Getting Started
First time here? Don't worry — we've got you covered! 😊
Below is a step-by-step guide to help you set up your Doorman for the very first time. Just follow along — everything is laid out in the order you need to do it.
Thank you so much for choosing Doorman and supporting this project! ❤️
Disclaimer
By using or installing Doorman, you accept full responsibility for any modifications made to your intercom system. System behavior may vary depending on your specific installation and environment.
If you are uncertain about any part of the setup or wiring, please consult a qualified electrician. Improper installation may result in device malfunction or damage to your intercom system.
NOTE
This is not an official or certified product. It is the result of a reverse engineering effort and is provided as-is, with no guarantee of compatibility, safety, or functionality.
Required Tools and Materials
Some tools and materials aren't usually found in every household. To set up Doorman smoothly, make sure you have:
- A small flathead screwdriver (~2 mm)
- 2–3 connecting cables (approx. 15–30 cm each)
- Electricity 🦖
Got everything? Great! Now RTFM!!
Flashing the Firmware
If you bought a pre-flashed Doorman PCB, you're good to go — skip this step! 🎉
But if you built your own board or need to update the firmware, now's the time to flash it. Otherwise, you'll be staring at a very quiet device while wondering why nothing works. 😄
Connect the Wires
Start by opening your indoor station's enclosure. On most models, you'll find screw terminals labeled a, b, E, and P.
The Doorman connects in parallel to the bus — just like any other device.
Before proceeding, review the power supply options below and choose the one that best suits your setup.
CAUTION
NEVER connect ANY POWER SOURCE to the BUS terminals*.
This includes the P line from the intercom. And no, Patrick, Mayonnaise is not an instrument.
As soon as Doorman attempts to transmit data on the bus, serious and potentially irreversible damage will occur.
Always double-check every connection before plugging anything in.
*The labeling on the board may vary depending on the revision: A+B, TCS:BUS, or TC:BUS.
Power supply options:
3-Wire Mode via indoor station Recommended
IMPORTANT
Please remove the jumper cap on BUS PWR before you proceed!
The intercom's power supply must provide at least 60 mA, which is usually the case.
However, since the available power is limited, connecting additional devices like the Doorman S3 directly to the bus may cause instability in the system.
Connect the b wire (ground) to the bus terminal labeled B on your Doorman, and the a wire (24 V bus) to the terminal labeled B. In older revisions, these corresponded to the TCS:BUS or TC:BUS terminals (spanning two pins).
Then connect the P line (+24V) to the P terminal on your Doorman.
Example: 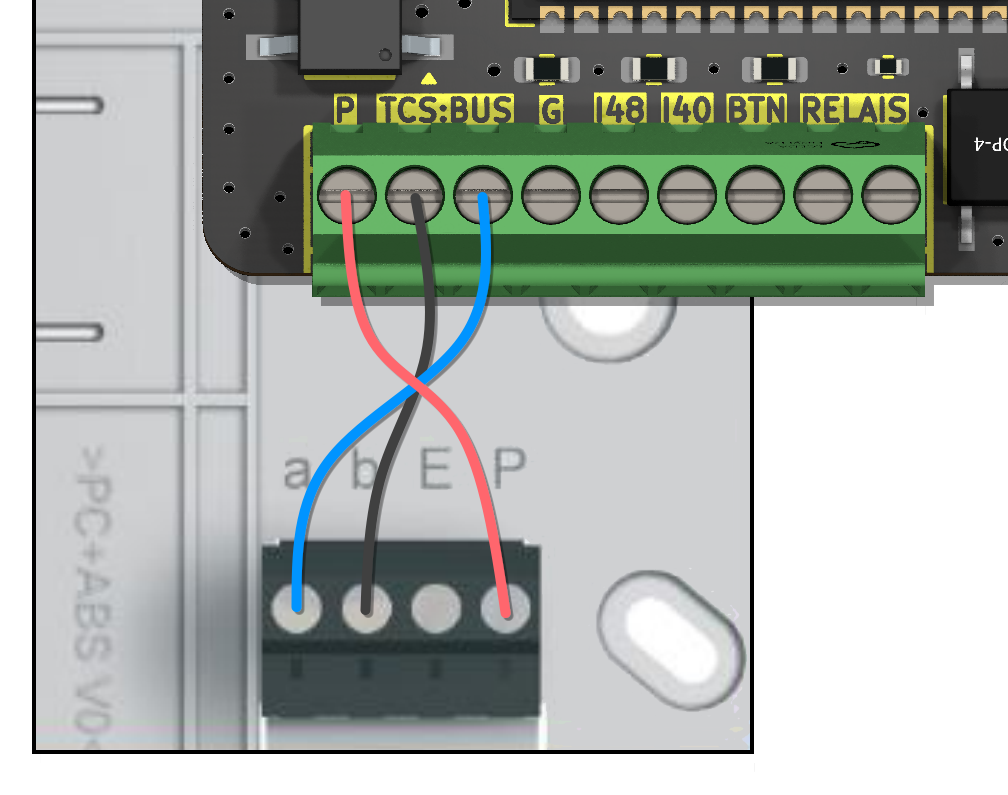
2-Wire Mode via indoor station Hardware revision 1.5 and later
INFO
Using the a-bus line as a power source on revisions older than 1.5 results in a loud beeping noise. This issue is likely due to the high-frequency switching power supply.
Starting with revision 1.5 this method will only produce a subtle, yet noticeable hissing sound on the speaker.
IMPORTANT
The intercom's power supply must provide at least 60 mA, which is usually the case.
However, since the available power is limited, connecting additional devices like the Doorman S3 directly to the bus may cause instability in the system.
Connect the b wire (ground) to the bus terminal labeled B on your Doorman, and the a wire (24 V bus) to the terminal labeled B. In older revisions, these corresponded to the TCS:BUS or TC:BUS terminals (spanning two pins).
Once connected, place a jumper cap on BUS PWR to enable power from the bus.
Example: 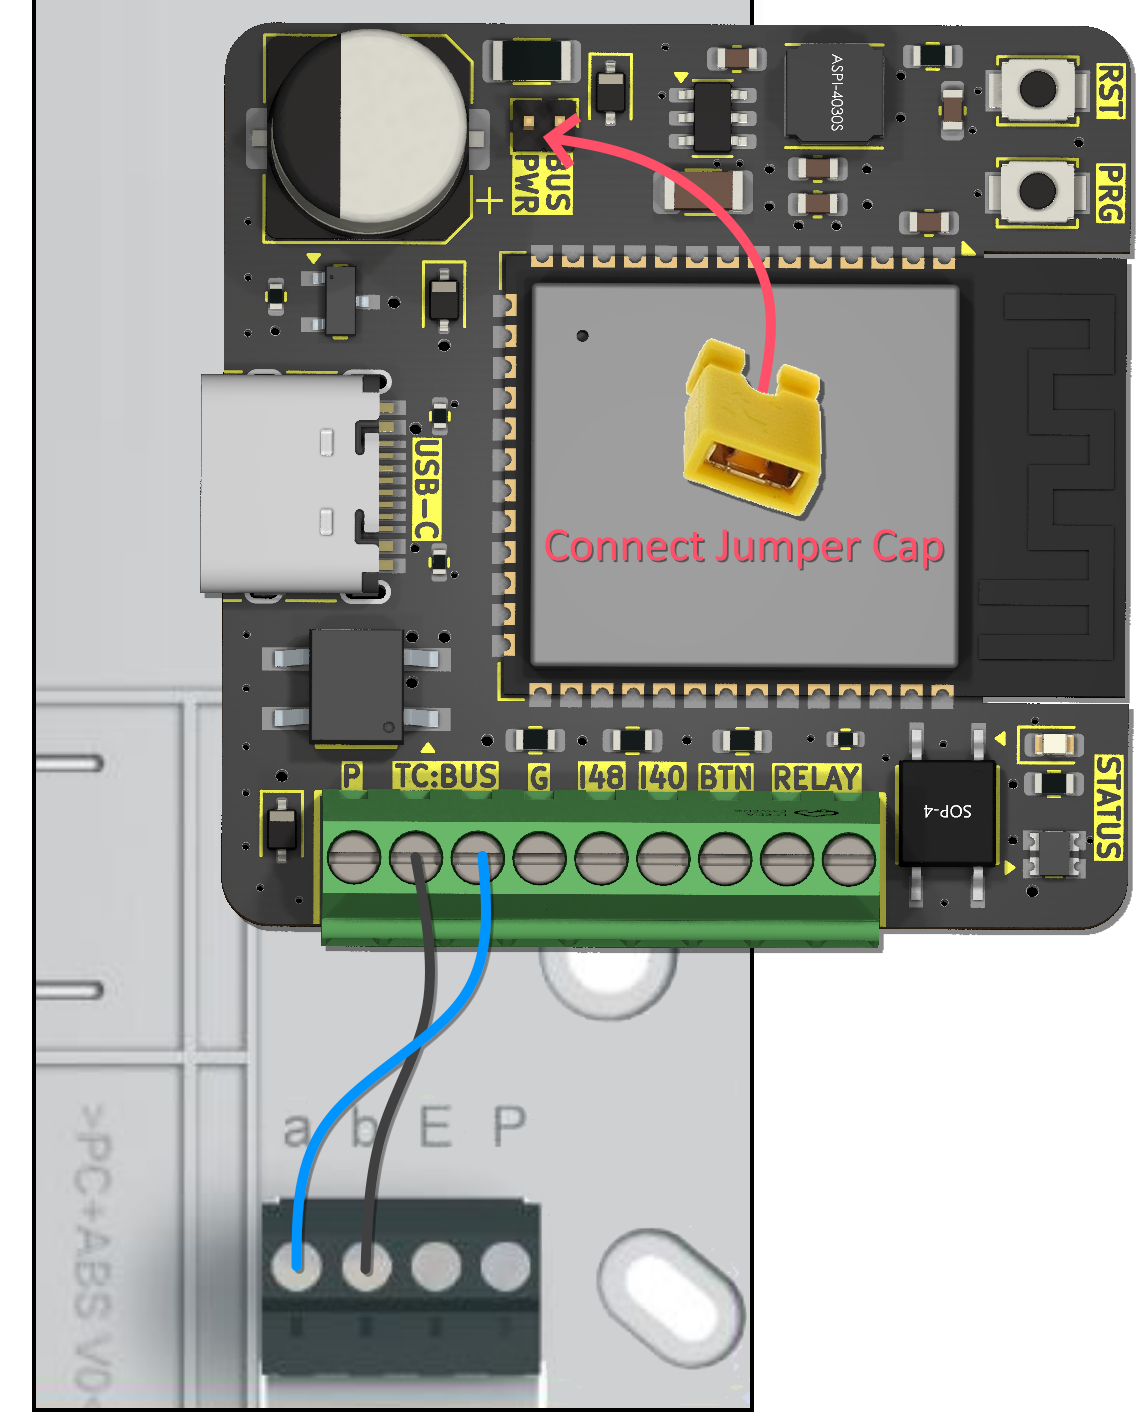
2-Wire Mode via external wired Power Supply
IMPORTANT
Please remove the jumper cap on BUS PWR before you proceed!
KNOWN ISSUE
You may encounter issues receiving telegrams. If this happens, you'll need an isolated power supply to eliminate ground noise.
The problem occurs because Doorman's power supply is not electrically isolated, which can cause ground loops when two different grounds are connected.
Connect the b wire (ground) to the bus terminal labeled B on your Doorman, and the a wire (24 V bus) to the terminal labeled B. In older revisions, these corresponded to the TCS:BUS or TC:BUS terminals (spanning two pins).
Then connect the external power supply to your Doorman using the P (+5V to +30V) and G (Ground) screw terminals.
Example: 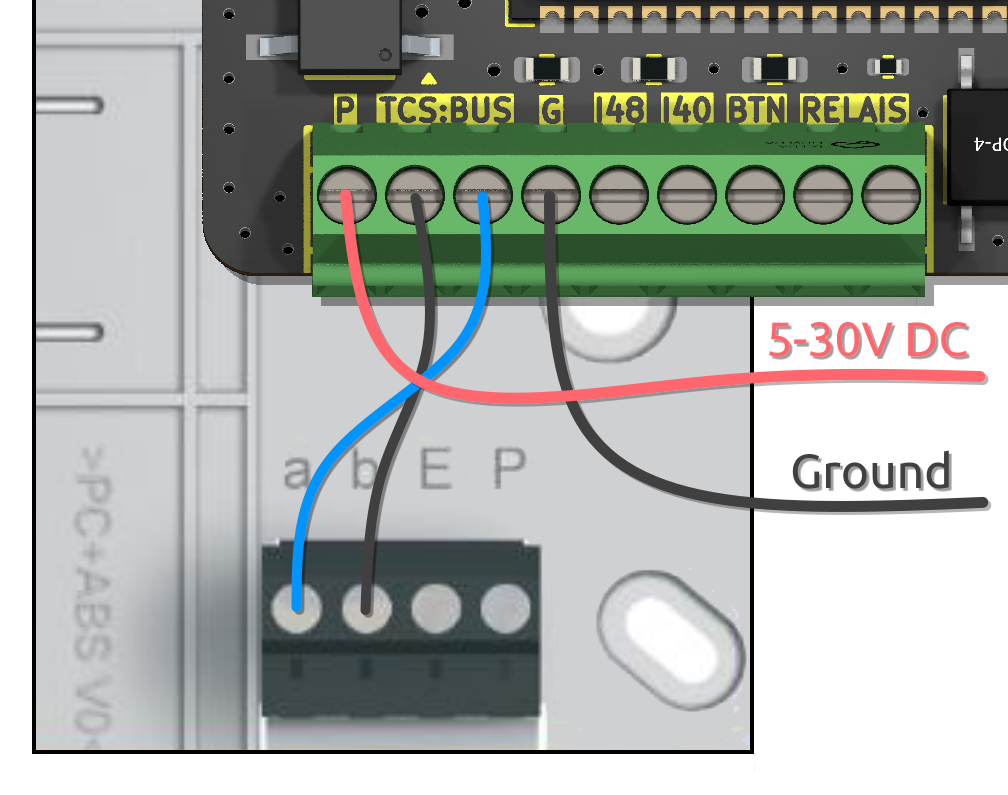
2-Wire Mode via external USB-C Power Supply
IMPORTANT
Please remove the jumper cap on BUS PWR before you proceed!
KNOWN ISSUE
You may encounter issues receiving telegrams. If this happens, you'll need a USB isolator (or example, this one) to eliminate ground noise.
The problem occurs because Doorman's power supply is not electrically isolated, which can cause ground loops when two different grounds are connected.
Connect the b wire (ground) to the bus terminal labeled B on your Doorman, and the a wire (24 V bus) to the terminal labeled B. In older revisions, these corresponded to the TCS:BUS or TC:BUS terminals (spanning two pins).
Then, power your Doorman using the USB-C port.
Example: 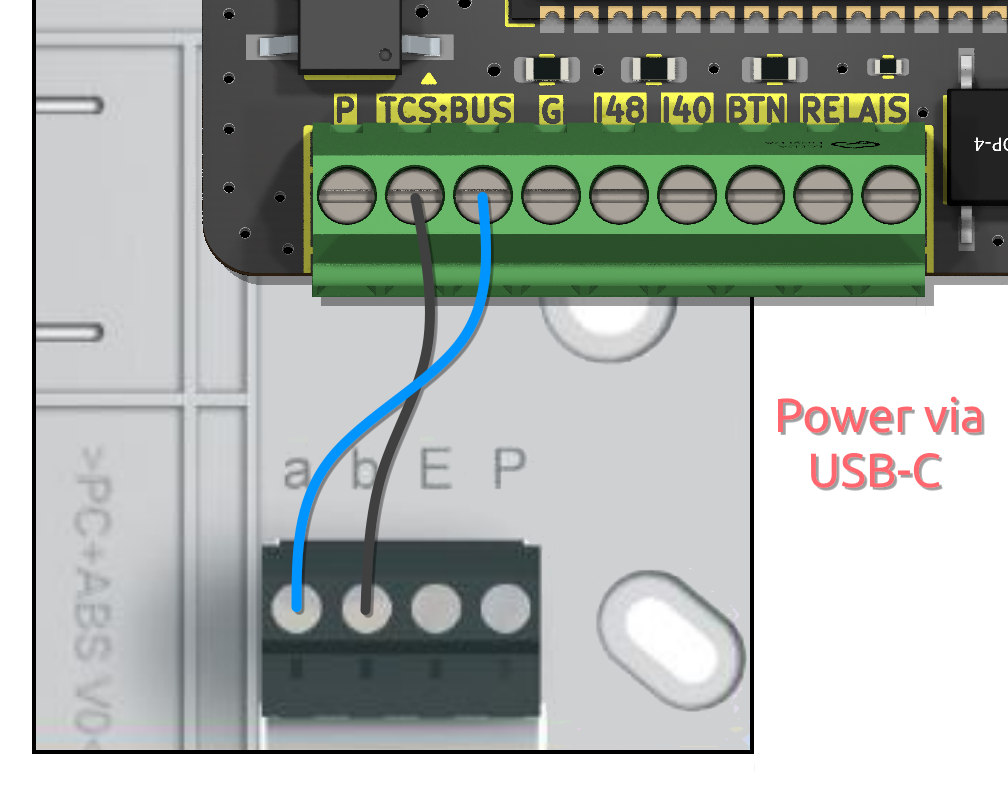
Connect to Wi-Fi
When you power on your Doorman S3 for the first time, the LED will blink rapidly in yellow/orange, indicating that it's ready to connect to Wi-Fi.
You can connect it to Wi-Fi using one of three methods:
Access Point or Improv Serial (USB).
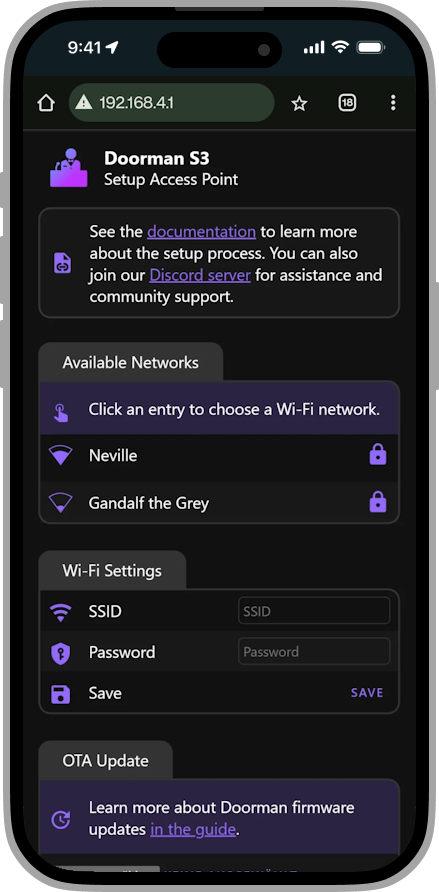
Access Point
Connect to the Wi-Fi network named
Doorman S3 Setup. Use the password:Op3n-Sesame!Once connected, the setup page should open automatically.
TIP
You might also see a pop-up or notification asking you to sign in to the network.
If nothing happens, just open your browser and go to http://192.168.4.1 or click the button below:
Enter the Wi-Fi credentials for the network you want your Doorman to join.
Once you see “Wi-Fi connected successfully”, you can close the window.
Your Doorman is now connected and ready to be added to Home Assistant using the ESPHome integration.
Improv Serial USB Connection
If your device isn't showing up automatically, or you're setting it up for the first time, this method is a great alternative.
Just connect your Doorman to this computer using a USB cable, then click the button below to connect it to Wi-Fi:
Add to Home Assistant Home Assistant integration
BEFORE YOU PROCEED
This is the default for all pre-flashed Doorman units.
You can skip this step if you haven't flashed the Home Assistant Smart Home integration.
After you connect your Doorman to your Wi-Fi network, it will start blinking slowly in blue. This means it's waiting for Home Assistant to connect.
It should appear automatically in Home Assistant. If it doesn't, your network may be blocking mDNS (Multicast DNS), which is required for device discovery.
Make sure your Home Assistant instance is updated to the latest version to ensure compatibility with your Doorman device.
Open the Home Assistant app on your mobile device and navigate to Settings → Devices & Services.
Look for a new device labeled
Doorman S3(ESPHome) and tap Add.After a successful connection, it will light up solid blue for 3 seconds. Your Doorman is now added to Home Assistant and ready to use.

Setup MQTT Broker MQTT integration
BEFORE YOU PROCEED
You can skip this step if you haven't flashed the MQTT Smart Home integration.
After you connect your Doorman to your Wi-Fi network, it will pulse red and blue. This means the MQTT broker is not yet configured.
Open the web interface and go to the
MQTT Configurationsection.Enter your MQTT broker credentials.
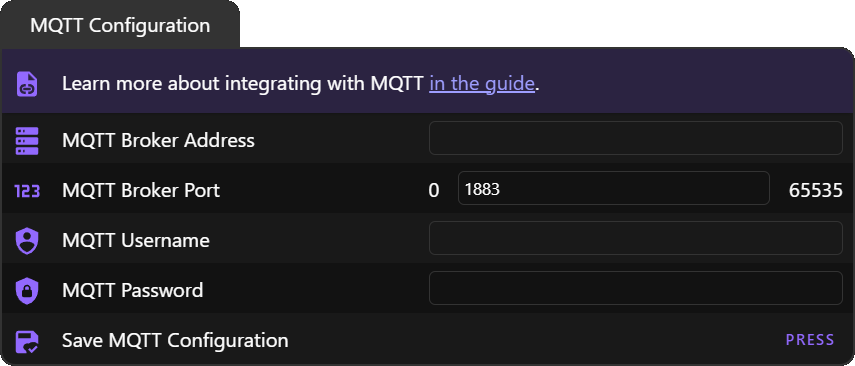
If you don't see these settings, scroll to the bottom and click "Show all".
Save the settings — the firmware will then try to connect to your MQTT broker.
If it connects successfully, the status LED will light up solid blue for 3 seconds to confirm.
HomeKit Pairing HomeKit integration
BEFORE YOU PROCEED
You can skip this step if you haven't flashed the HomeKit Smart Home integration.
After flashing the firmware with HomeKit integration and connecting Doorman to your Wi-Fi network, the status LED will pulse red and blue to indicate that HomeKit is not paired yet.
Follow the steps below to pair it with the Home app on your iPhone or iPad:
To pair Doorman via HomeKit, open the Home app on your iPhone or iPad. Tap the "+" icon and select "Add Accessory".
Scan the HomeKit setup QR code on the right side.
If you can't scan the code, select "I Don't Have a Code or Cannot Scan" and then choose "Enter Code Manually" to type in the setup code:291-21-998Follow the on-screen instructions to complete pairing.
Once connected, you can control Doorman through the Home app or with Siri.

Interactive Setup
TIP
When you first connect your Doorman to Home Assistant, it will be in Setup Mode for interactive setup already.
You don't need to manually activate this mode; it will start automatically at each reboot as long as the setup process has not been completed.
BEFORE YOU PROCEED
The indoor station must be connected, to complete the setup process.
1. Access the Settings
Open the settings either through your Doorman's web interface or visit the ESPHome Integration page and select the Doorman S3 device.
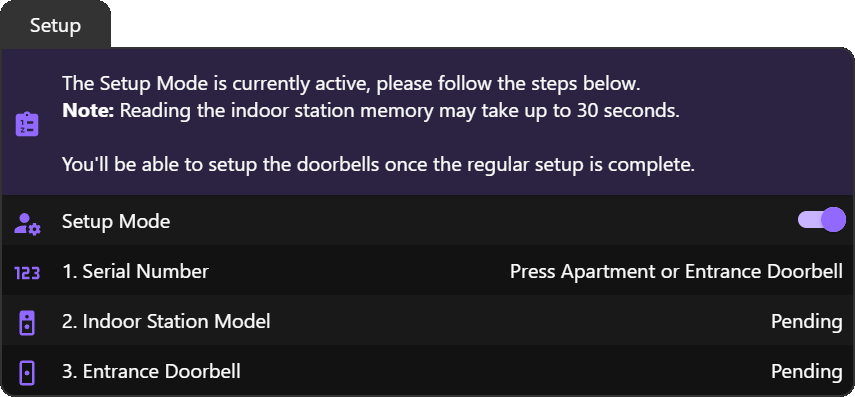
2. Activate Setup Mode
Go to the Configuration (Home Assistant) or Setup (Doorman web interface) section and enable Setup Mode to begin the interactive setup.
TIP
Access the Doorman web interface and navigate to the Setup section to see your current setup state.
Follow the instructions there to complete the setup.
3. Outdoor Station Discovery
Once setup mode is activated, the RGB status LED will pulse green-turquoise slowly and the system will automatically scan for outdoor stations.
🕒 This process can take up to 30 seconds.
DISCOVERY FAILED
If no outdoor stations are found, the LED will turn solid red and setup mode will be disabled automatically.
Make sure your outdoor station is connected and powered, then re-activate Setup Mode to try again.
4. Ring the Doorbell
After the outdoor stations are found, the LED will pulse green-turquoise fast while the system waits for a doorbell press.
Press the doorbell button at your apartment or entrance. The system will save your indoor station's serial number and immediately attempt to identify the model.
5. Indoor Station Identification
After pressing the doorbell, the LED will pulse green-turquoise slowly again while the indoor station model is being identified.
IDENTIFICATION FAILED
If the model could not be identified, the LED will turn solid red for 3 seconds and setup mode will be disabled automatically.
You can select the model manually afterwards.
The setup is still considered complete in this case.
6. Memory Read
Once the indoor station model is identified, the LED will pulse green-turquoise slowly while the system attempts to read its memory.
🕒 This process can take up to 30 seconds.
MEMORY READ FAILED
If reading the memory fails, the LED will turn solid red for 3 seconds and setup mode will be disabled automatically.
This is non-critical — the setup is still considered complete. You can re-activate Setup Mode to try again if needed.
7. Setup complete
The LED will remain solid green-turquoise for 3 seconds, then turn off, and Setup Mode will be disabled automatically.
PLEASE NOTE
The entrance door entities require address configuration before they appear. Indoor station settings require the model to be set first. If entities are still missing after configuration, restart Doorman or reload the ESPHome integration in Home Assistant.
Next Steps
You're probably looking to configure your Doorman. To get started, open the Doorman web interface or the Home Assistant device dashboard.
TIP
The Doorman web interface is sometimes available at doorman-s3.local, or you can simply use its IP address.
If you're unsure about what each entity does, what it controls, or how to configure it, check out the Entity Reference for a detailed guide on all available entities, their functions, and setup options.
If you're a power user, don't forget to explore the Customization section. Tailor Doorman to your exact needs and tweak it however you like.
Still having issues?
If you're having trouble setting up your Doorman in Home Assistant, we're here to help.
Join us on Discord to get assistance and discuss with other users.